

| 일 | 월 | 화 | 수 | 목 | 금 | 토 |
|---|---|---|---|---|---|---|
| 1 | 2 | 3 | 4 | 5 | 6 | 7 |
| 8 | 9 | 10 | 11 | 12 | 13 | 14 |
| 15 | 16 | 17 | 18 | 19 | 20 | 21 |
| 22 | 23 | 24 | 25 | 26 | 27 | 28 |
| 29 | 30 |
- visualstudio
- Costume
- ue5
- animating
- c++
- 언리얼엔진
- C
- iclone
- 애니메이팅
- cc4
- autodesk
- C언어
- reallusion
- 티스토리챌린지
- unreal
- JavaScript
- character
- charactercreator
- 개발블로그
- HTML
- 개발
- modeling
- 마야
- 3dmodeling
- 프로그래밍
- UnrealEngine
- ANIMATION
- js
- 오블완
- 3d
- Today
- Total
개발나라 스용공주
[React] props 전달하기 본문
이번 글은 props에 대한 글이다.
[ Props ]
함수에 인수를 전달하듯 값을 전달할 때 컴포넌트에 전달된 것으로 객체 형태로 전달된다.
객체로 부모의 값이 전달되고 부모에서 자식으로만 전달할 수 있다.
props는 JS, html, react 컴포넌트 등을 담을 수 있다.
[ 부모 - App 컴포넌트 ]
import './App.css'
import Button from './components/Button';

function App() {
  return (
    <>
      <Button text={"메일"}/>
      <Button text={"카페"}/>
      <Button text={"블로그"}/>
    </>
  )
}

export default App
[ 자식 - Button 컴포넌트 ]
const Button = (props)=>{
console.log(props);
return <button>클릭</button>;
};
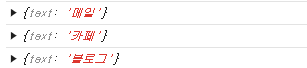
export default Button;Button 컴포넌트의 인수로 props를 가져와서 이 값을 콘솔 창에 출력하면 아래 결과가 나온다.
=> 부모 컴포넌트에서 text={"메일"}, text={"카페"}, text={"블로그"} 등의 값을 받은 것이 객체로 출력되는 것을 확인할 수 있다.
=> 부모에서 props를 전달해주면 그 값을 객체로 묶어서 자식의 매개변수로 제공됨
[ Props 활용하기 ]
아래 코드를 보면 props로 받아온 값은 객체이므로 객체에서 키(key)를 불러오는 형식으로 활용 가능하다.
import "./App.css";
import Button from "./components/Button";

function App() {
  return (
    <>
      <Button text={"메일"} color={"red"} />
      <Button text={"카페"} />
      <Button text={"블로그"} />
    </>
  );
}

export default App;
const Button = (props) => {
console.log(props);
return <button style={{color: props.color}}>{props.text}</button>;
};
export default Button;=> 컬러와 텍스트 값을 부모에서 전달받은 props의 값을 자식에서 매개변수로 받아서 객체값으로 전달

props를 받을 때 구조분해할당으로 작성하면 구조분해할당 변수를 사용해서 작성할 수 있다.
const Button = ({text, color}) => {
  return <button style={{ color: color }}>{text}</button>;
};
[ 기본값 설정하기 ]
color값이 undefined일 때 오류가 나는 것을 방지하기 위해 기본값을 설정해줄 수 있다.
Button.defaultProps = {
  color: "black",
};
[ props의 spread ]
props가 많아질 경우 객체로 만들어준 뒤 spread로 뿌려준다.
props가 객체의 형태로 전달되기 때문에 객체로 묶어서 spread로 뿌려줄 수 있다.
import "./App.css";
import Button from "./components/Button";

function App() {
  const buttonProps = {
    text:"메일",
    color:"red",
    a: 1,
    b:2,
    c:3,
  };
  return (
    <>
      <Button {...buttonProps} />
      <Button text={"카페"} />
      <Button text={"블로그"} />
    </>
  );
}
[ html 요소 추가하기 ]
자식의 매개변수를 하나 더 추가하여 부모의 <Button>아래에 있는 <div>가 추가된 매개변수에 들어간다.
import "./App.css";
import Button from "./components/Button";

function App() {
  const buttonProps = {
    text:"메일",
    color:"red",
    a: 1,
    b:2,
    c:3,
  };
  return (
    <>
      <Button {...buttonProps} />
      <Button text={"카페"} />
      <Button text={"블로그"}>
        <div>자식요소</div>
      </Button>
    </>
  );
}

export default App;
const Button = ({text, color,children}) => {
return <button style={{ color: color }}>{text}{children}</button>;
};
Button.defaultProps = {
color: "black",
};
export default Button;=> 컴포넌트 넣어주기 : <컴포넌트명 /> 추가해주기


'WEB > React' 카테고리의 다른 글
| [React] useRef - reference 생성 (1) | 2024.12.13 |
|---|---|
| [React] state로 입력받고 처리하기 (0) | 2024.12.13 |
| [React] props와 state의 상호작용 (0) | 2024.12.13 |
| [React] state와 re-rendering (0) | 2024.12.13 |
| [React] 이벤트 핸들링 (event handling) (0) | 2024.12.13 |


